
Scandinavian design, known for its minimalist elegance and cosy atmosphere, has become a global favourite. Rooted in simplicity, functionality, and a connection to nature, it’s the perfect style for creating a serene and inviting home.
If you’re looking to infuse your space with Nordic charm, these 11 easy DIY projects will help you craft your own Scandinavian sanctuary.
1. Wooden Floating Shelves
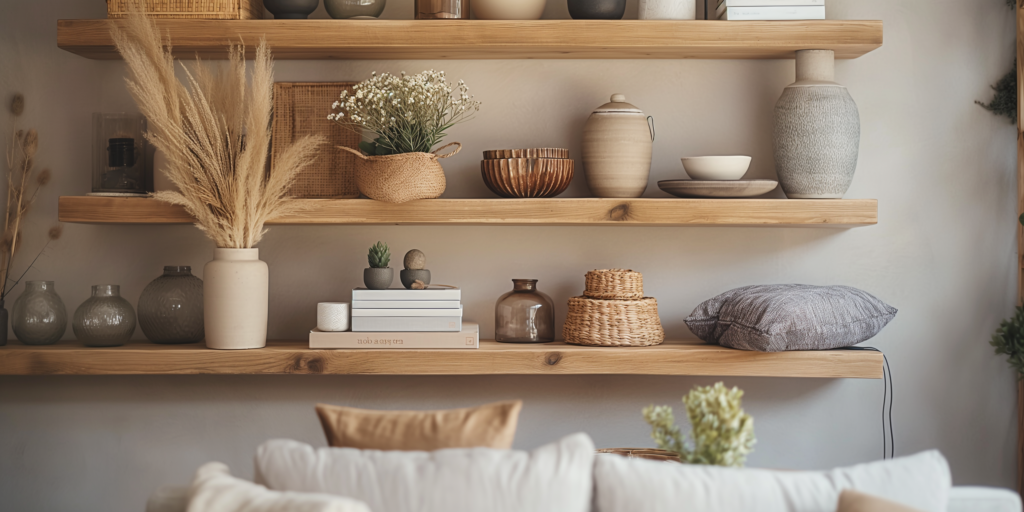
Floating shelves are a staple in Scandinavian design, providing both form and function. To create your own:
- Materials Needed: Reclaimed wood or pine boards, sandpaper, wood stain or paint, brackets, screws, drill.
- Steps:
- Cut the Wood: Measure and cut the wood to your desired shelf length.
- Sand and Finish: Sand the edges and surfaces until smooth. Apply stain or paint for a polished look.
- Install Brackets: Attach brackets to the wall, ensuring they are level and secure.
- Mount Shelves: Place the shelves on the brackets and secure them with screws.
These shelves are perfect for displaying books, plants, and decor. They embody the clean lines and natural materials central to the Scandinavian style.
2. Cosy Knit Blankets
Nothing says hygiene like a soft, chunky knit blanket. Here’s how to make one:
- Materials Needed: Chunky yarn, knitting needles or your arms (for arm-knitting).
- Steps:
- Choose Your Yarn: Opt for soft, thick yarn in neutral colours like cream, grey, or taupe.
- Start Knitting: Cast on your stitches and knit away! For arm-knitting, use online tutorials to get the hang of the technique.
- Finish Off: Once you reach your desired length, bind off the stitches and weave in any loose ends.
Drape your blanket over a sofa or bed to add warmth and texture to your space.
3. Minimalist Wall Art
Scandinavian decor often features simple, abstract art. Here’s a quick guide to creating your own:
- Materials Needed: Canvas or thick paper, acrylic paint, brushes, painter’s tape.
- Steps:
- Prepare Your Canvas: Use painter’s tape to create geometric shapes or abstract designs.
- Paint: Fill in the shapes with neutral or muted tones like black, white, and beige.
- Remove Tape: Carefully peel off the tape to reveal crisp lines.
- Frame: Once dry, frame your art for a polished look.
Hang your art in a prominent place as a stylish focal point.
4. DIY Plant Holders
Bringing nature indoors is a key element of Scandinavian design. Create beautiful plant holders to showcase your greenery:
- Materials Needed: Macramé cord, ceramic pots, wooden stands.
- Steps:
- Macramé Plant Hanger: Learn basic macramé knots to create hanging plant holders.
- Paint Pots: Customise ceramic pots with simple designs using paint.
- Wooden Stands: Craft stands from wood scraps to elevate your plants off the floor.
Group plants in varying heights for a dynamic, verdant display.
5. Simple Linen Curtains
Linen curtains add a light, airy feel to any room. Here’s how to make or customise them:
- Materials Needed: Linen fabric, sewing machine, curtain rings or ties.
- Steps:
- Measure and Cut: Measure your windows and cut the fabric accordingly.
- Hem the Edges: Sew hems along the edges for a clean finish.
- Add Rings or Ties: Attach curtain rings or sew ties to the top for easy hanging.
These curtains will let in plenty of natural light while maintaining privacy.
6. Natural Fibre Rugs
A natural fibre rug can anchor a room and add texture. Create your own using jute, sisal, or cotton:
- Materials Needed: Natural fibre rope or fabric strips, sewing machine or hot glue gun.
- Steps:
- Prepare the Fibers: Cut the rope or fabric into manageable lengths.
- Weave or Braid: Weave or braid the fibres into a flat, circular shape.
- Secure: Use a sewing machine or hot glue gun to secure the ends and maintain the shape.
Place your rug in a high-traffic area to add durability and style.
7. Functional Storage Solutions

Scandinavian design emphasises clutter-free spaces. Build or repurpose storage solutions to keep your home organised:
- Materials Needed: Wooden crates, baskets, modular shelving units.
- Steps:
- Customise Crates: Paint or stain wooden crates and stack them to create shelving.
- Organise with Baskets: Use baskets to store items neatly within open shelves.
- Modular Units: Assemble modular shelving units for a flexible storage solution.
These solutions will help you maintain a tidy, stylish space.
8. Handmade Candle Holders
Candlelight is essential for creating a cosy atmosphere. Make your own candle holders:
- Materials Needed: Wood, clay, or metal, tools for shaping and finishing.
- Steps:
- Design: Sketch out your candle holder design.
- Shape: Use tools to carve, mould, or cut the material into your desired shape.
- Finish: Sand or paint the holders for a polished look.
Use scented candles to enhance the ambience of your home.
9. Personalised Throw Pillows
Throw pillows are an easy way to add comfort and style. Create custom designs:
- Materials Needed: Fabric, sewing machine, fabric paint or embroidery thread.
- Steps:
- Choose Fabric: Select fabrics that complement your colour scheme.
- Sew Pillowcases: Sew square or rectangular pillowcases.
- Decorate: Use fabric paint or embroidery to add patterns or designs.
Arrange pillows on your sofa or bed for a cosy, inviting look.
10. Upcycled Furniture Pieces
Give old furniture new life with a fresh coat of paint or new hardware:
- Materials Needed: Old furniture, paint, brushes, and new hardware (knobs, handles).
- Steps:
- Prep the Surface: Sand down the furniture to remove the old finish.
- Paint: Apply a coat of primer followed by paint in your chosen colour.
- Add Hardware: Replace old knobs and handles with new ones.
Upcycled furniture adds character and sustainability to your home.
11. Nature-Inspired Wall Decor
Bring the outside in with natural elements for wall decor:
- Materials Needed: Dried flowers, branches, leaves, frames, shadow boxes.
- Steps:
- Collect Materials: Gather dried flowers, branches, and leaves.
- Arrange: Arrange these elements in frames or shadow boxes.
- Mount: Hang the frames or boxes on your walls.
This decor adds a touch of nature and tranquillity to your space.
Conclusive Thoughts
Incorporating DIY Scandinavian decor into your home is a rewarding way to create a stylish and personal space. Each project, from wooden floating shelves to nature-inspired wall decor, allows you to infuse your home with the clean lines, natural materials, and cosy atmosphere characteristic of Nordic design. So grab your tools, get creative, and enjoy the process of crafting your very own Scandinavian nook.
Happy decorating!


